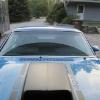
blksn8k2 Posted February 27, 2022 Author Share Posted February 27, 2022 17 minutes ago, akirby said: Have you thought about black racing stripes? The hood has the correct factory style stripes with the engine size stenciled in the stripes. 1 Quote Link to comment Share on other sites More sharing options...
blksn8k2 Posted February 27, 2022 Author Share Posted February 27, 2022 (edited) The only other specs I could find on the wheels are that the front 17x7s have 0mm offset and the rear 17x8s have -10mm offset. Oops, the link I posted earlier shows the backspacing as 4" on the fronts and 4.5" on the rears. Duh. Edited February 27, 2022 by blksn8k2 Added BS nos. Quote Link to comment Share on other sites More sharing options...
blksn8k2 Posted March 13, 2022 Author Share Posted March 13, 2022 I did a trial fit today of the QA1 front coil-overs. This is at max drop. I just wanted to see how low it could go. The tires surprisingly never touched the fenders even at full steering lock. Final ride height will be at least 1/2" higher than this although 1" higher would probably be about right. Biggest issue at this height is lack of sufficient exhaust header clearance from the road. Quote Link to comment Share on other sites More sharing options...
blksn8k2 Posted March 17, 2022 Author Share Posted March 17, 2022 I was waiting on a set of Torrington style thrust bearings for the coil-overs before setting the final front ride height. Those bearings are used between the bottom of the coil spring and the spanner nut that is used to support the spring as well as adjust the ride height. The bearings basically make it easier to turn the spanner nuts as well as reduce the amount of binding in the springs. The thrust bearings, washers, spanner nuts and external threads on the body of the shock were all coated with anti-seize before assembly. This particular QA1 coil-over also uses roller bearings in lieu of bushings in the upper and lower eyelet mounts. Believe it or not the front end is now about 2 1/2" lower than it was with the previous set of springs which were advertised as 1" lowering springs when I bought them. Quote Link to comment Share on other sites More sharing options...
HotRunrGuy Posted March 17, 2022 Share Posted March 17, 2022 Looking good! HRG Quote Link to comment Share on other sites More sharing options...
blksn8k2 Posted March 19, 2022 Author Share Posted March 19, 2022 For the battery I was looking for a modern AGM type with a flat top that I could disguise as an original Autolite. What I found was a Braille B6034 which is one their Endurance Series batteries. It has 850 CCA and 135 min of reserve capacity. Then I bought an inexpensive decal kit that included the fake fill caps. All I had to do was peel off the Braille decal from the top and stick on the Autolite decals and caps. The Cobra Jet cars used a plastic heat shield on the battery so that's where I placed the side decals. Quote Link to comment Share on other sites More sharing options...
blksn8k2 Posted March 23, 2022 Author Share Posted March 23, 2022 I found this on Ebay a few years ago and finally got around to framing it. Quote Link to comment Share on other sites More sharing options...
blksn8k2 Posted July 11, 2022 Author Share Posted July 11, 2022 Thought I should post an update on the Mach 1. I haven't had a lot of time to work on it lately but I am making some progress. The main things I have been concentrating on recently have been the exterior lights and getting the hood back on. I was having some crazy issues with the lights, mainly on the driver side. I couldn't get either side marker light to work nor the front parking light which sits under the bumper and inside the cutout in the front valance. The culprits turned out to be poorly assembled light sockets. That included the driver side taillight and both front parking lights. All of the bad parts were purchased new from the aftermarket and not original Ford parts. Turns out that the wires inside several of the brand new light sockets were reversed. The goal is supposed to be to match the color coding of the wires to the original wiring diagrams and to each other at every connection point. Apparently no one ever explained that to the Chinese. I had to flip the wires on one taillight and both front parking lights. At all three locations the bright side of each light would come on just by turning on the headlight switch. In the case of the taillight, the bright side is supposed to work off the switch on the brake pedal or the 4-way hazard switch or the turn signal lever, not the headlight switch. Similar issue with the front parking lights under the bumper. These also happen to be the only locations that use dual function 1157 bulbs. Go figure. As I said, until I got all that figured out I couldn't get some of the side marker lights to work and the turn signals wouldn't flash at all. Amazing how something screwed up in one spot (in this case three spots) can cause crazy stuff to happen everywhere else. No wonder nobody wants to work on wiring on all the automotive TV reality shows. Surprisingly I have had zero problems with any part of the new wiring harness. So far all of the wires are the correct colors and in their proper locations. In other words, it matches the original Ford wiring diagrams perfectly. You would think that if there was going to be a problem it would be somewhere in all that spaghetti and not in a few simple light sockets. ? The only real issue has been that the taillight sockets that were part of the wiring harness wouldn't fit into the holes in the taillight housings inside the trunk. So I purchased sockets that would fit into the housings and spliced those into the wiring harness. And sure enough, one of those sockets was screwed up. What are the odds? The crazy part is that I purchased all of that stuff from the same vendor. You would think they would make sure that all of their parts were compatible with each other but I guess that's asking a little too much. After all that, I finally have all the exterior lights working properly. I even have fully functioning turn signals and hazard lights. I was a little surprised to find that all of the side marker lights also flash. So I guess you really can't call the hazard lights "4-ways". If you count the two lights in the back of the hood scoop they're actually "10-ways". LOL As far as the hood goes, it went back on with no real issues. I was afraid the top mounts for the QA1 coil-over shocks were going to interfere with the hood but that obviously didn't happen. Quote Link to comment Share on other sites More sharing options...
coupe3w Posted July 11, 2022 Share Posted July 11, 2022 Glad you got it all sorted out. I hate wiring too! Quote Link to comment Share on other sites More sharing options...
blksn8k2 Posted July 12, 2022 Author Share Posted July 12, 2022 16 hours ago, coupe3w said: Glad you got it all sorted out. I hate wiring too! Thanks! I forgot to mention that the amber sport lamps in the grille and the backup lights in the rear valance are also functioning properly with no wiring issues. I also got the wipers working properly. After the initial reassembly of the car they only worked on low speed and parked straight up instead of at the base of the windshield. After replacing the wiper switch with a new one and correcting the linkage all is back to normal. And the windshield washer pump even works. One other issue that I did have with the exterior lights was the lack of a high beam function for the headlights. That turned out to be my fault as I had plugged that particular wire into the wrong socket on the wiring harness plug at the firewall. Next up should be the interior lights. The only light that comes on so far is in the passenger side sail panel and that only works when you either open the passenger side door or turn the headlight switch all the way counter-clockwise. Again, all new wiring but this time with mostly original light sockets which may need to be replaced. In addition to the sail panel lights, which are above the rear seat on either side, there are courtesy lights in each door panel and under the dash on both sides. This model never had a true dome light which is a bit odd. Quote Link to comment Share on other sites More sharing options...
coupe3w Posted July 12, 2022 Share Posted July 12, 2022 My '67 fastback interior lights are the same except I don't have the deluxe interior which would have had the door lights. yeah not much interior light in these older cars. Quote Link to comment Share on other sites More sharing options...

Recommended Posts
Join the conversation
You can post now and register later. If you have an account, sign in now to post with your account.
Note: Your post will require moderator approval before it will be visible.