
blksn8k2
-
Posts
2,636 -
Joined
-
Last visited
-
Days Won
15
Content Type
Profiles
Forums
Gallery
Downloads
Store
Everything posted by blksn8k2
-
If you consider the Coyote an evolution of the modular design Ford is now using cylinder deactivation on a mod motor. The 2021 F-150 5.0L has it. “The 5.0-liter V-8 gets a bump of 5 horsepower and 10 pound-feet of torque, to 400 horsepower and 410 pound-feet,” said Dawn McKenzie, Ford Truck Communications Manager. “We’ve also added a variable displacement cylinder deactivation function to the 5.0-liter, helping fuel economy by reducing the number of cylinders receiving fuel during lower speeds and under light loads.” https://pickuptrucktalk.com/2020/10/2021-ford-f150-5-0l-v8-engine/
-
True, unless the plan includes using it in vehicles other than full-size trucks where packaging is not as much of an issue.
-
The only complaint I have with the gen 3 Coyote is the amount of nasty noises it makes. And I'm not referring to the exhaust. There are times when it absolutely sounds like a damn diesel. Rattles, clangs, ticks, you name it, it makes all those noises at times and at other times it is relatively quiet, but not very often. Ford says it is "normal". Bullshit! The only reason I would get rid of my '18 F-150 is because of the embarrassing sounds the damn thing makes. It certainly doesn't have the sound of a quality product. Not by a long shot. This particular thread on F150forum.com currently has 1798 posts about those issues and 744,469 views: Ford F150 Forum - Community of Ford Truck Fans > Late Model F150s > 2015 - 2020 Ford F150 > 2018 5.0L - Engine Rattle Noise On Deceleration And/Or Acceleration ***TSB 18-2354*** The first few posts sound hopeful but it goes downhill fast after that. As far as I know there is no permanent fix other than earplugs. 2018 and newer Mustangs with the 5.0L have the same issues.
-
What are the odds Ford will actually add a pickup variant to the "big" Bronco lineup? I've read all the articles that were prompted by the design sketches from a Ford video but that was over a year ago and there hasn't been much, if anything, since. My ideal vision of a Bronco pickup would be a four-door hybrid model with a V6 EcoBoost and an optional onboard generator similar to the F-150 PowerBoost. It would have a minimum tow rating of 7000 lbs and be available with all the same options as the non-pickup Bronco, including a removable top. That I would trade my F-150 for in a heartbeat. Just make it available in the same classic Grabber Green metallic as my EB. And if Ford does decide to do one, how does that affect the Ranger?
-
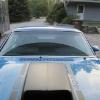
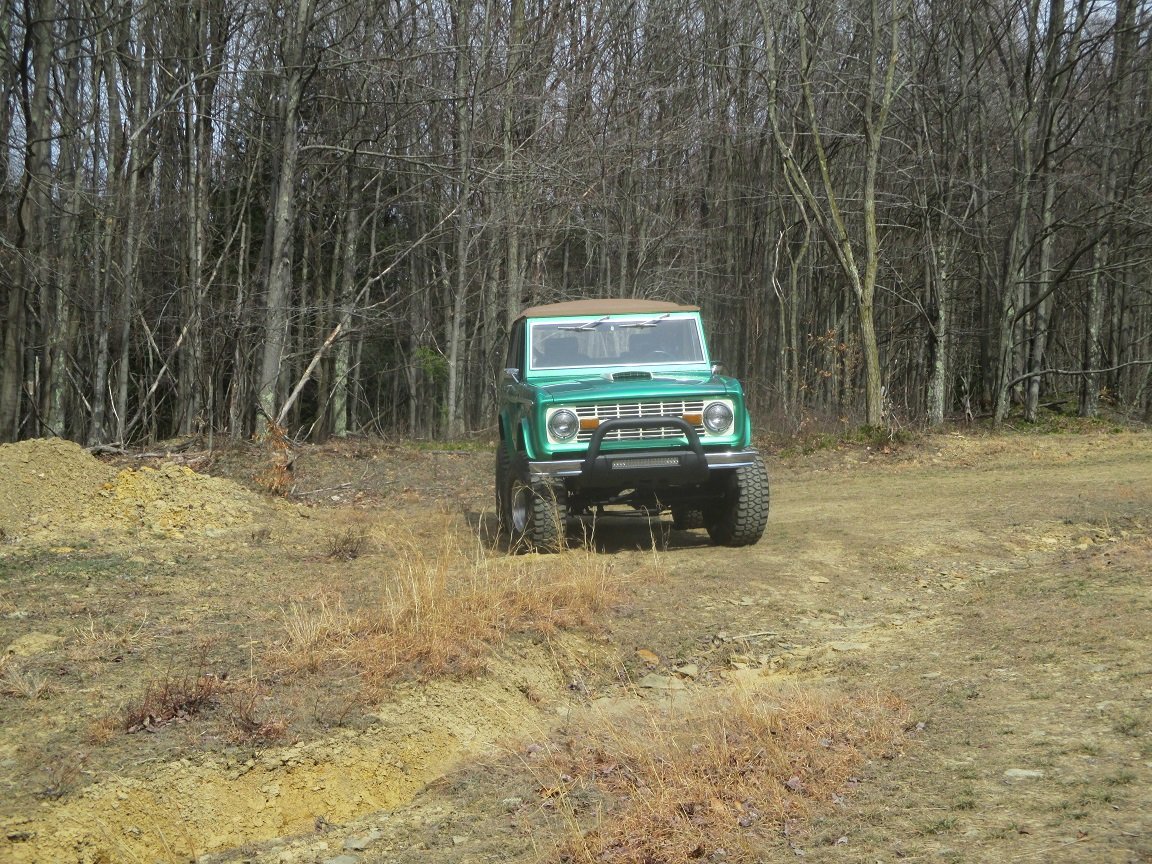
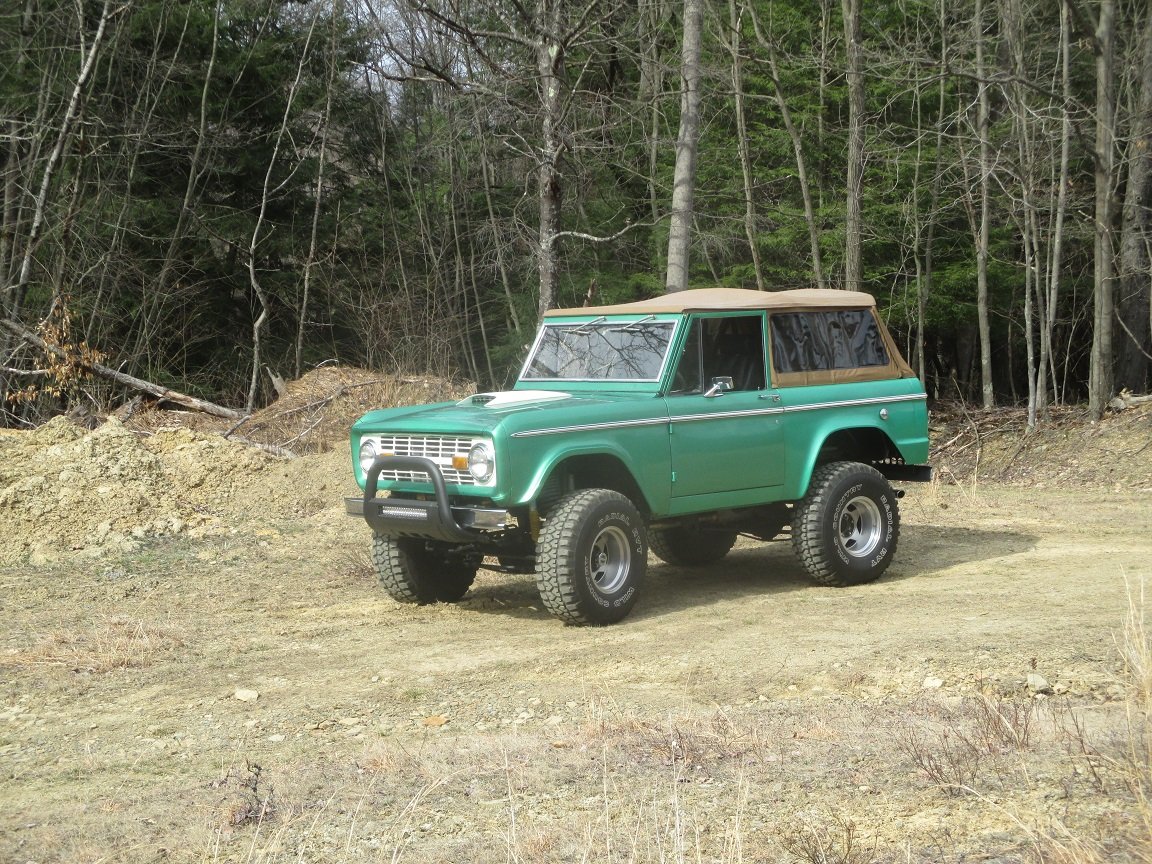
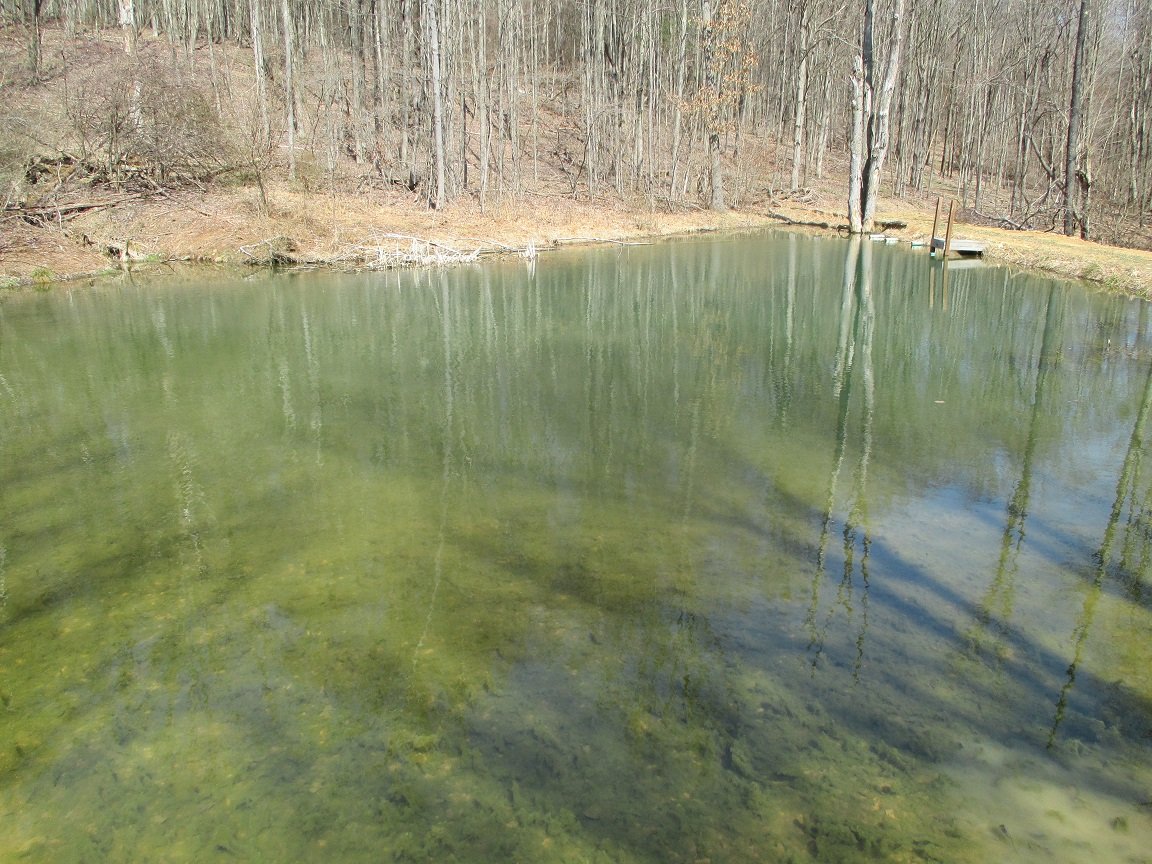
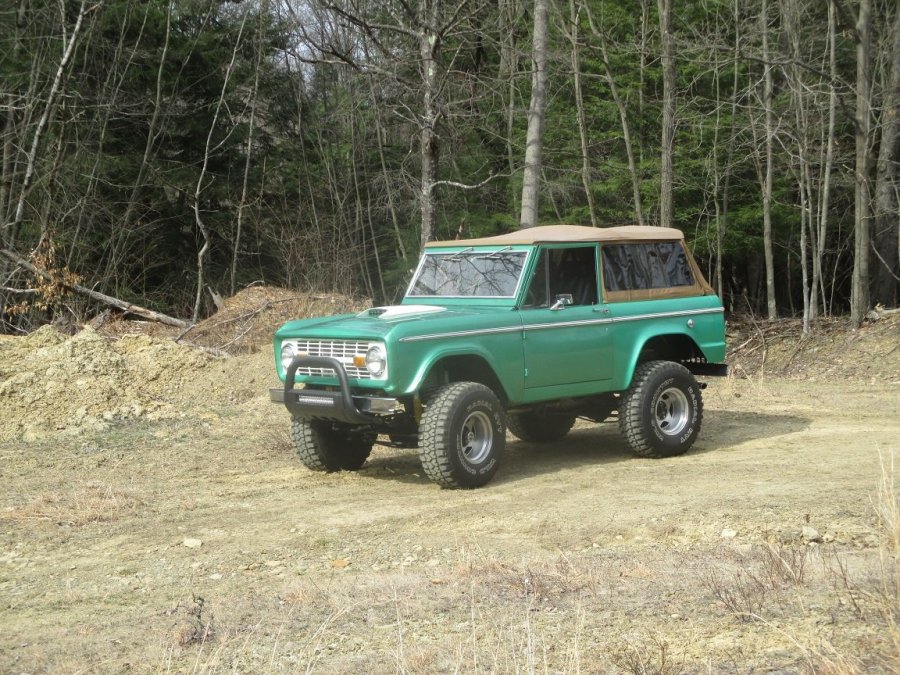
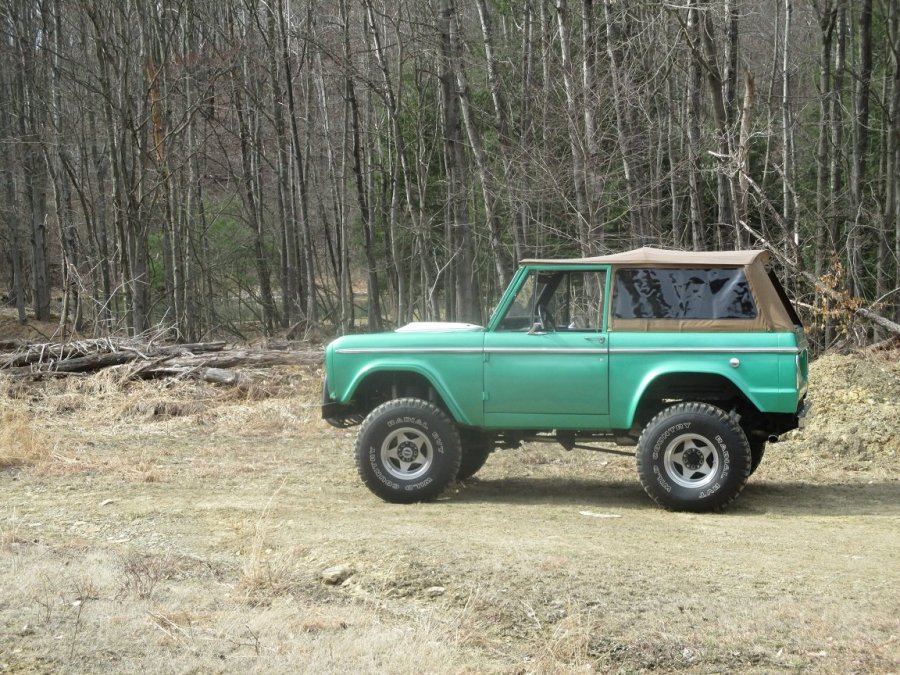
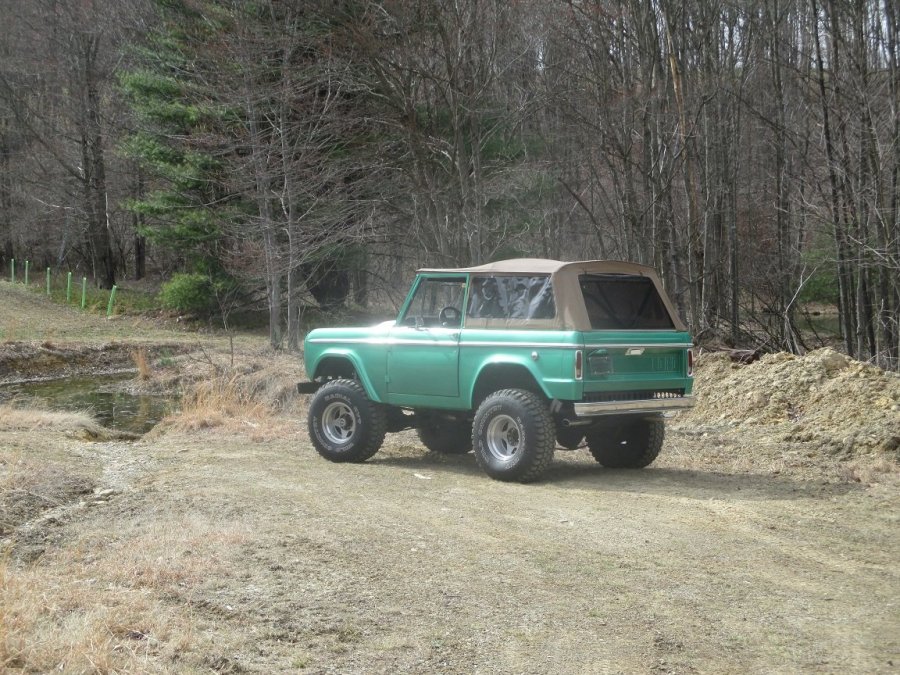
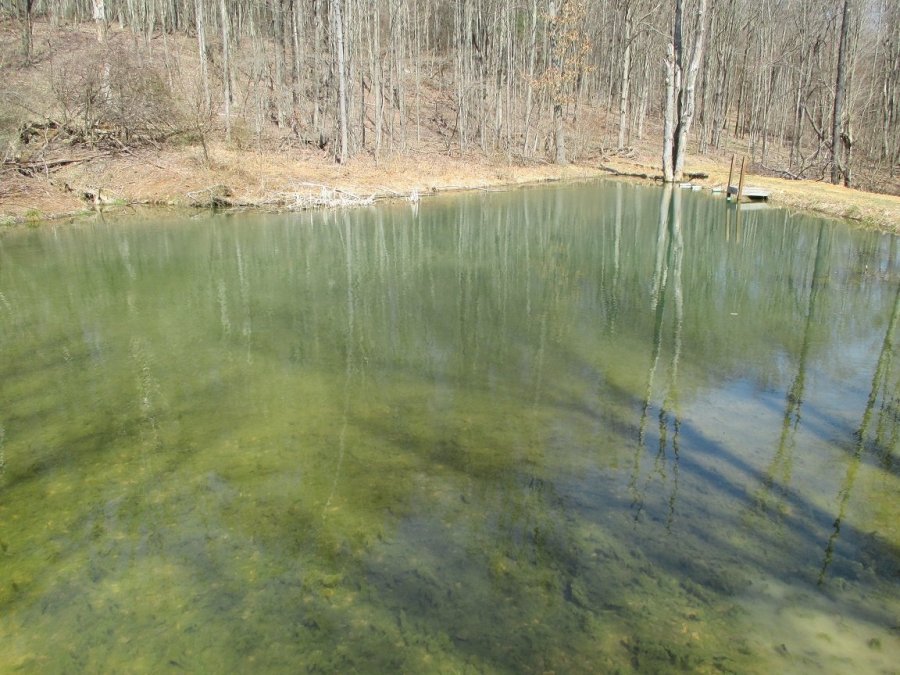
Took a few pics of the Bronco in the wild today. This was near the ponds on my property. The larger of the two ponds is in the background of the third photo and the smaller pond is in front of the Bronco in the fourth photo. The last photo is of the larger pond.

-
I ordered some parts for the Bronco a few days ago from CJ Pony Parts, which is located near Harrisburg, PA. They shipped what they had in stock from Harrisburg on 3/29 using "UPS Mail Innovations". It first went to Bridgeport, NJ on the 29th and was in Columbus, OH yesterday where they supposedly gave it to the USPS so they can bring it back to PA. WTF? Doesn't sound very "innovative" to me... If they had driven all that distance, which I assume some of it was by air, they would have traveled approximately 750 miles farther than if they had just brought it directly from Harrisburg to my house. The parts that were not in stock a few days ago were supposedly ready to ship today. Probably via Alaska. ?
-
Since we seem to have moved into the wild-assed speculation phase, what if Ford decides to make the 6.8 in both iron and aluminum block versions? The iron block could be the replacement for the 6.2 in truck applications while the aluminum block version could replace the 5.2 in the GT500 and could also serve duty in the 2022 Raptor. It's not as if Ford hasn't done something similar in the past. Both the 4.6 and 5.4 mod motors were examples of very similar strategies.
-
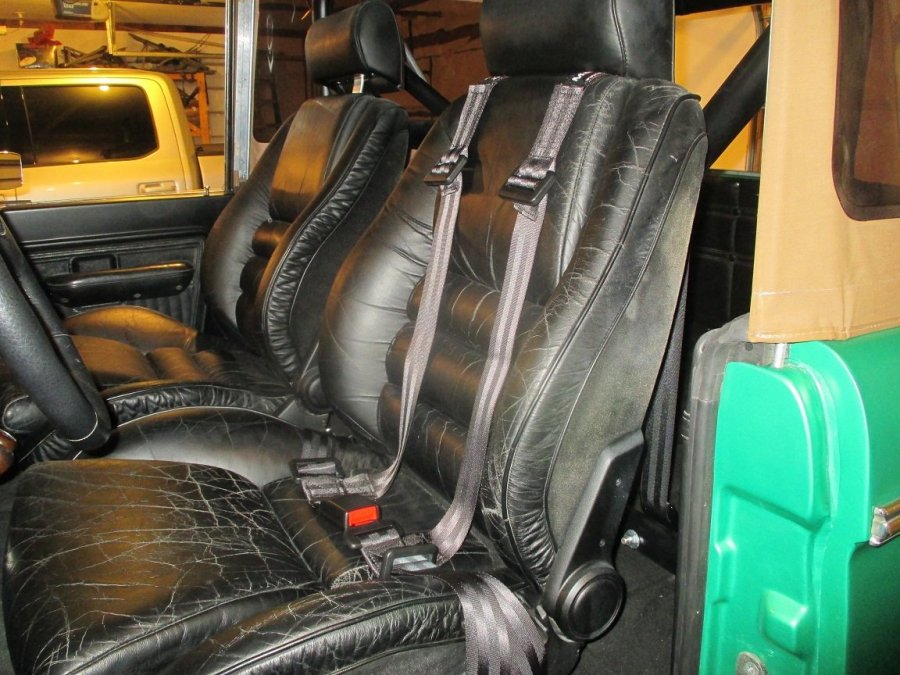
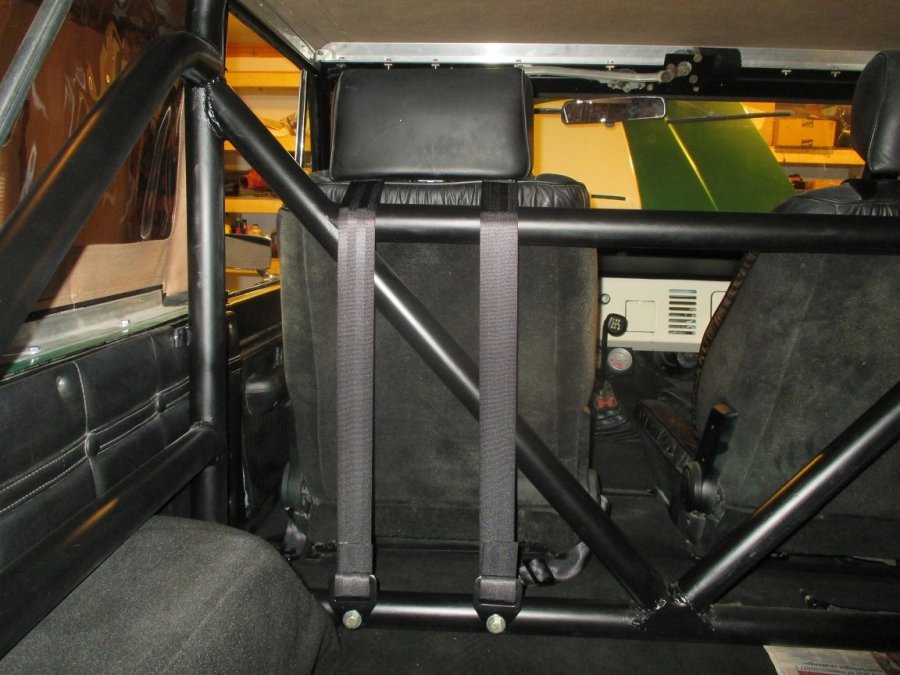
Added a MasterCraft brand 4-point harness from Summit Racing on the driver seat today. I also ordered a set of shoulder strap pads but they haven't shipped those yet. Will do the same on the passenger seat. They're actually pretty darn comfortable even without the shoulder pads. I also like the single buckle design. Easy on and off.
-
Any details yet on the design of the bed cover? Every pic we have seen so far has it and they all appear to be a one-piece hard cover. Not sure how convenient that would be. My last Sport Trac had the OEM two-piece lockable hard cover which was great for keeping things secured in the bed but it was a real PITA if you needed to haul something tall that required a fully uncovered bed. It probably weighed about 50 lbs and was a bit of a handful for one person to remove and reinstall. Not only was it heavy but it was awkward to get everything realigned with all the spring loaded pins, etc.
-
I finally got around to putting a timing light on it. Before that I decided to make a piston stop so I could verify that the timing marks on the crank balancer were correct. They were off by about 4°. The stop is made from an old Autolite spark plug. I removed the guts and then tapped it for 3/8-24 threads and installed a long bolt. The way it works is that you pull the plug for No. 1 cylinder, install the stop and turn the engine over by hand until the piston bumps against the bolt, then mark where the pointer is on the balancer. You then turn the crank in the opposite direction until it hits the stop again, then mark that spot as well. You then measure the distance between the marks, divide in half and mark the balancer at the midway point. That is TDC (Top Dead Center). Once I had that established I could see that the timing was about 4° retarded which explains why it was running a little warm. I reset the timing to about 6° BTDC with the vacuum unplugged from the vacuum advance canister on the distributor. What you see in the photo is about what you would see with the timing light at idle after the vacuum is reconnected to the distributor. After all that it now starts immediately, idles at 180° and no longer tries to diesel when I turn off the ignition. That had more to do with the idle adjustment on the carb being set too high but it wouldn't idle at a lower setting until I got the timing set correctly. What causes an engine to "diesel", or try to run backwards when you shut off the ignition is usually some carbon deposits in the combustion chambers along with a slightly open throttle. An IC engine can't run without air, fuel and spark. However, if there are hot spots in the combustion chambers they will act as the spark even after the ignition is off and the engine will try to run in reverse if it has enough air and fuel which makes it critical that the throttle adjustment is set as low as possible at idle. Back in the early days of emissions tuning the manufacturers set the timing and carb adjustments for lower emissions and would install a throttle solenoid switch which would hold the throttle slightly open so that the engine could idle but when the ignition was turned off it would retract and allow the throttle blades to close completely and thus prevent "dieseling". I've been running it around on the property quite a bit just trying to get all the bugs worked out. Next up will be to get it registered and inspected so I can put some real miles on it. After I hosed off some of the mud I couldn't resist making another short video.

-
My understanding is that the 2021 Mustang GT will continue with the same gen 3 Coyote as the 2018 through 2020. I have a 2018 F-150 and my Coyote has the same noise issues as your 2019 GT. The 5.0L Coyote in the 2021 F-150 does get some major changes with the addition of cylinder deactivation and a new belt driven oil pump design but I doubt either of those changes will result in a quieter Coyote. Neither of those changes apply to the 2021 Mustang.
-
Do they not even watch each other's videos? That's carrying social distancing a little too far, eh?
-
Not a big surprise but the basic shape of the unclad front fenders looks very similar to the Bronco Sport. Hard to tell from these latest photos but the junction of the hood and fenders looks different. The hood on the Sport rolls over the tops of the fenders. The photos of the clad versions seem to show something completely different but that could just be some imaginative use of the cladding tape.
-
Where's Andre when you need him? ?
-
Parnelli Jones' multi-time Baja winner "Big Oly" to be on the auction block at Mecum Indy. I'm planning to be there but as just another masked observer. https://www.mecum.com/lots/SC0521-461979/1969-ford-bronco-big-oly/?utm_source=BigOlyAnnouncement&utm_medium=Email&utm_campaign=SC21
-
I hope you're right because a true Bronco based pickup would be something I would be interested in. The next gen Ranger might be too but something tells me Ford just doesn't want to make the Ranger that good. A feature packed Bronco truck could be sold for a higher premium and would be less likely to pirate F-150 sales.
-
So back several months ago there were rumors of a Bronco truck variant. Most people assumed it would be based on the "big" Bronco and use a Ranger frame, etc. What are the odds that the Maverick is what really sparked those rumors since it seems to be basically a Bronco Sport based truck?
-
In today's world I have to believe a high mileage "work truck" engine would be more likely to be replaced with a complete crate engine assembly instead of a rebuild of the original. That would probably be less expensive considering downtime, etc. There would be a refundable core charge for the old engine which could then be rebuilt and resold. Part of the rebuilding process could also include building up the worn cylinder walls using Ford's PTWA spray bore process which would eliminate the need for machining the block to an oversize bore. Which means cylinder wall thickness is less of an issue today than it used to be. And, thinner cylinder walls would promote better heat dissipation as well. None of that would help the hot rodder's when it comes to achieving maximum displacement but I doubt that was a major concern when the Godzilla was being designed. BTW, what is the max displacement possible with an LS block?
-
My current daily driver is an '18 F-150 with the gen 3 Coyote. It's both the best thing about the truck and the worst thing about the truck. I love the power and exhaust sound of the V-8. Even the fuel mileage is acceptable. However, Ford did a horrible job on NVH with this generation of the Coyote. There are times when it makes noises at idle that anyone standing within 20 feet of it would swear it was a diesel. As far as I know Ford has never admitted that there is a problem nor has anyone been able to identify and remedy the problem(s). There were multiple changes to the Coyote between the gen 2 and gen 3 that could be the source of the problem but, again, I don't know if that has been identified. To be honest, I gave up reading all the negative posts on other websites about customers' lack of help with this issue through dealer service departments because it became obvious to me that there was not going to be any resolution. Maybe there has been some recent discovery and fix but I seriously doubt it. My personal opinion is that it has something to do with the camshaft drives but that's just a guess. There have been times when it sounds fine (no rattling sounds coming from the engine) but most of the time it just sounds like cheap crap when idling. I guess stop/start has more than one benefit. ? Anyway, the one thing that might give me a reason to trade my low mileage '18 would be if Ford offered some version of the Godzilla in the F-150. I know there have been some major changes again on the '21 Coyote (like cylinder deactivation) and hopefully the NVH issues were solved as well. I just stopped paying attention to the issue because it didn't appear to me that there would ever be a fix for my truck.
-
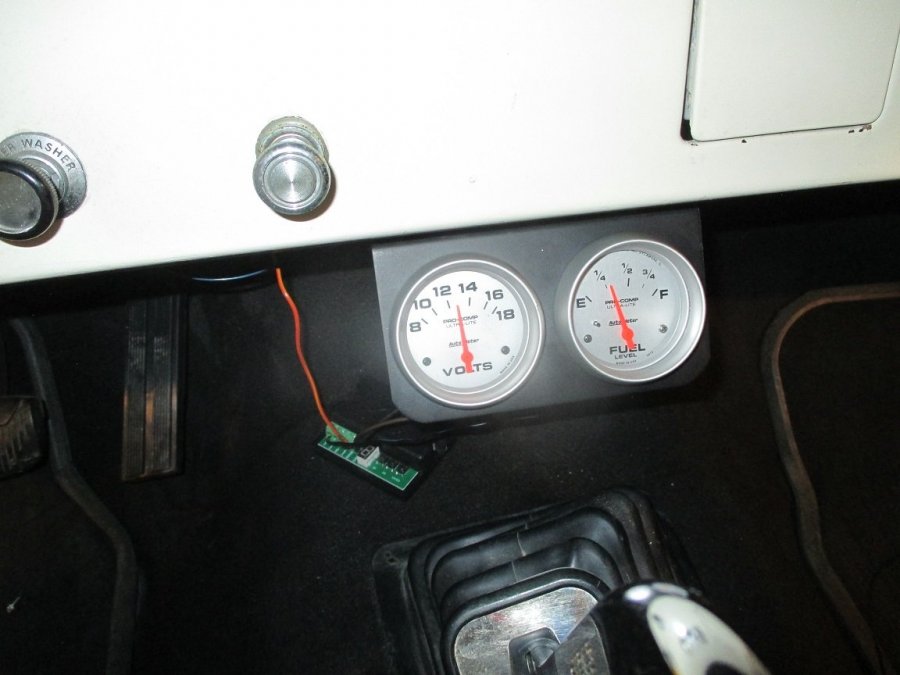
The Autometer fuel signal adapter module was actually in the mailbox yesterday and I installed it today. By using the "Learning" mode on the module I have been able to get the gauge to read a little more accurately. With about 10.5 gal in the tank it is now reading slightly above 1/4 tank. That's still not exactly right (should be closer to about 7/16 tank) but it's way better than "E" which is what the gauge was reading with the same amount of fuel with the new sending unit but without the module. With the sending unit out of the tank I was able to move the float up and down and adjust the gauge at F, 3/4, 1/2, 1/4 & E. As I drive it and see how it reacts to different fuel levels in the tank I should be able to tweak it a little more but this is good enough for a starting point. That's the module lying on the tunnel below the gauges. Eventually it will get mounted under dash. The module also has the option of adding a low fuel level light.
-
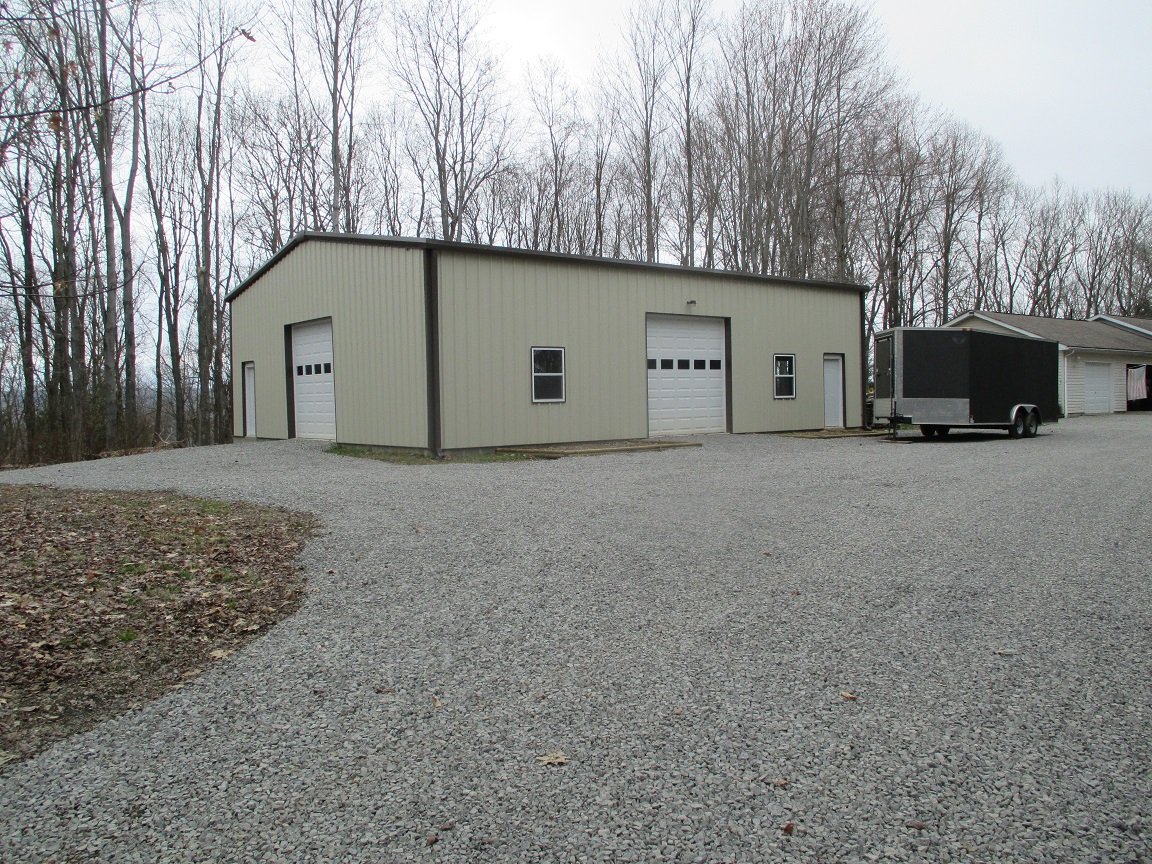
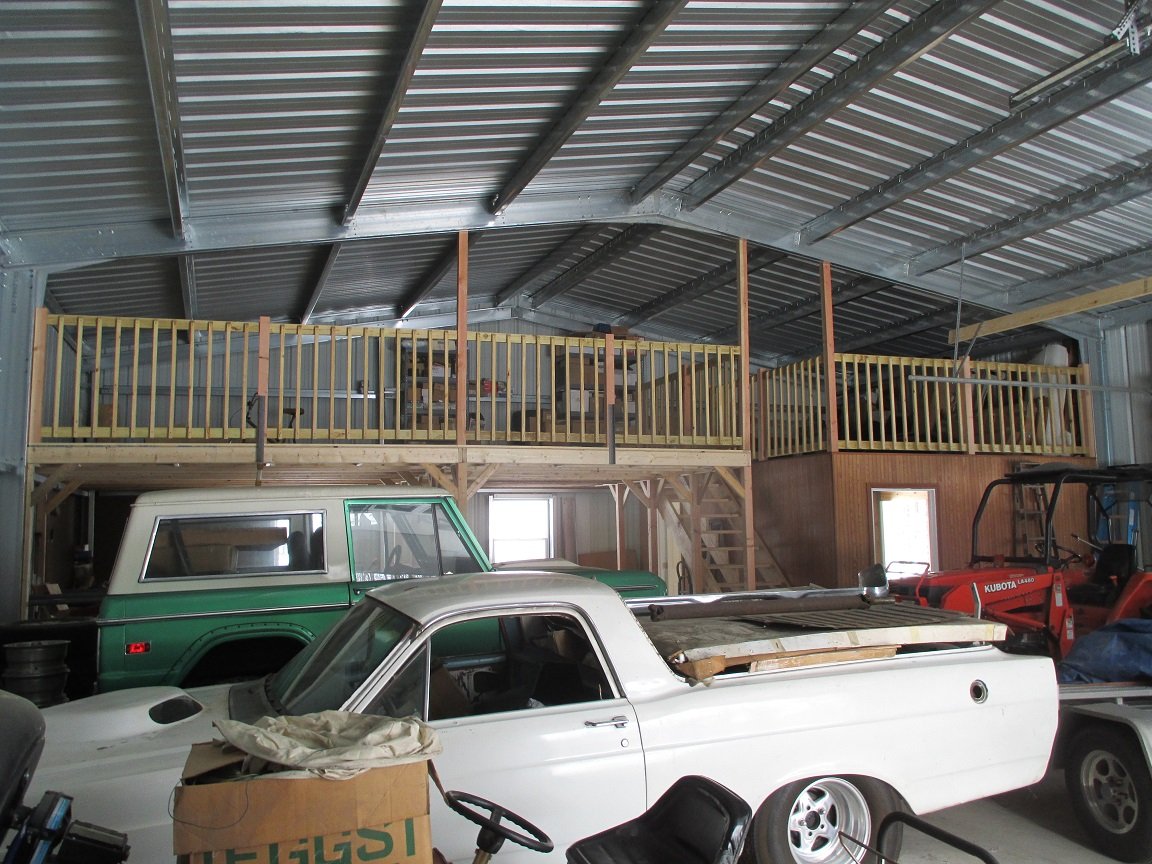
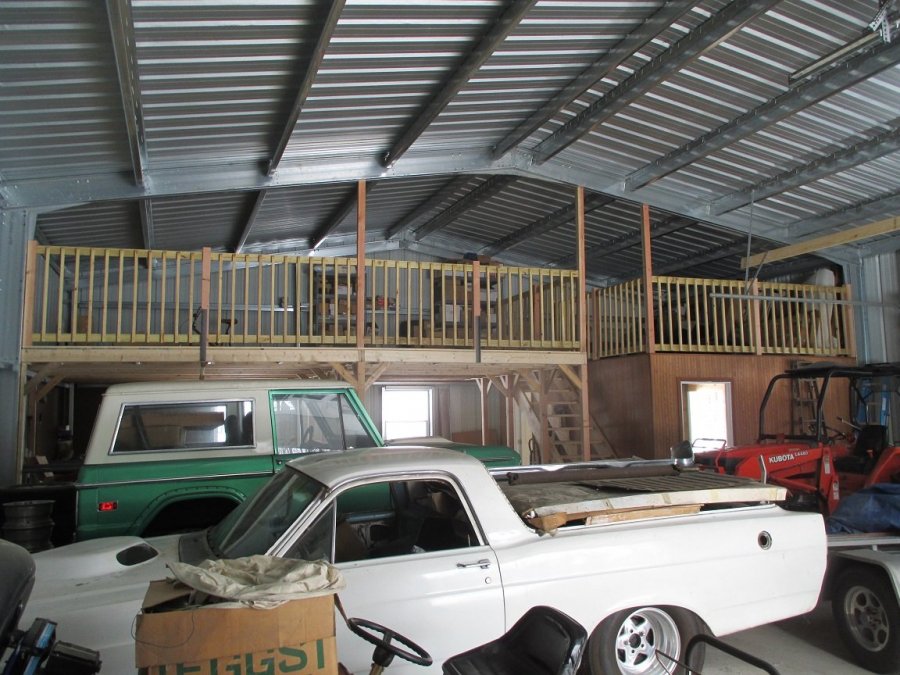
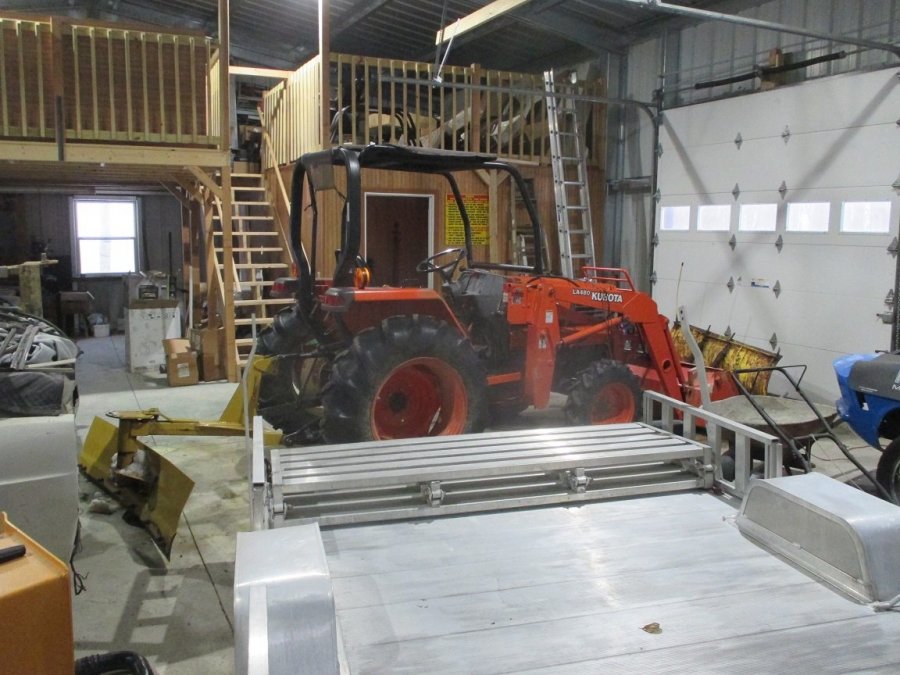
The building is 40ft x 50ft x 14ft at the sidewall eaves. It came from Olympia Steel Buildings in McKees Rocks, PA. I got a helluva deal on it when I bought it back in 2016. I paid $12,900 for the kit but that didn't include windows or doors but it did include the metal framing for all of those. That price also included shipping and PA sales tax but did not include erection. For that I hired a local Amish crew who also helped with pouring the concrete floor. I installed the doors and windows myself and designed and built the office and overhead storage loft myself with a lot of help from AutoCad and the loader bucket on the Kubota. I also modified the design by adding a block foundation which I laid myself. These typically sit on a concrete slab. The Kubota also did all of the landscaping which included tree stump removal and digging footers, floor drain ditches, etc. The inside photo is not long after I finished the loft and before I wired the building for electricity. The loft is on the end closest to the house and is pretty much full of junk now. ?

-
Shipping gods denied. This one is coming via USPS so no speed there. It did make it to the Pittsburgh suburbs by last evening. Should only take about three more days to make the last 100 miles...? At least this one should be in my mailbox along the side of the highway. I requested they drop the last delivery from UPS at my neighbors at the end of my lane. That was better than the previous UPS delivery which I eventually found on top of a snowbank a couple hundred yards from the highway. It's been warmer the past few days and my driveway is clear enough now that my nephew drove his '07 Roush Mustang back to my house today. A few days ago it was a sheet of ice. I made three low speed attempts on my 4x4 Kubota diesel tractor trying to climb a gradual grade that all resulted in the front end spinning around 180° with the tractor headed in the opposite direction in a matter of about three seconds. That's quite a thrill ride with a 6 foot snowplow bolted to a loader bucket all hanging on the front, a six foot grader blade hanging on the rear and two foot high snowbanks on either side. I thought I was going to get to test my home-built roll cage. ?
-
The reason I asked that is that it would seem the limited HP uses of the 6.8L would suggest that it would be a fairly low volume engine. Using a naturally aspirated version as the base engine in the Super Duty and perhaps even the higher trim models of the F-150 would kill at least two birds with one stone...
-
I have an Autometer Fuel Signal Adapter on order and I should have it by the end of this week, if the shipping gods allow. I did talk to Autometer about it but their technical "expert" kept assuming I had everything wired wrong or there was something wrong with the Autometer gauge. His suggestion was to send them the gauge so they could inspect it. After I got off the phone with him I tried wiring it the way he insisted and the gauge didn't work at all, which I fully expected would be the case because his method did not agree with the Autometer instructions I followed in the first place. When I asked him if their adapter would potentially solve my issue with the gauge reading "E" with 10.5 gallons in the tank he said no, that the adapter was only intended to be used when the sending unit and gauge were not within a compatible range of each other. In other words it could adjust for something like trying to use a GM sending unit with a Ford gauge or vice versa but it could not compensate for gauge inaccuracies when they were rated for the same range of resistance (Ohms). In my case both the sending unit and the gauge are rated to work within the 73-10 Ohms range. This was even though the description of the Autometer adapter includes the following statement: "Configurable option with linear adjustments at 5 points (F, ¾, ½, ¼, & E) anywhere between 0-1000 or 1000-0 ohms". So, when I talked to A Plus Rod & Kustom's real tech expert yesterday about a totally different design sending unit that they sell I also mentioned the issues I was having with what I have tried so far. He mentioned that they also sell a Tanks, Inc. brand signal adapter and that it is definitely capable of adjusting the signal coming from the sending unit the way I need it to and when I read the above statement from Autometer to him he said it should be able to do the same. If it doesn't at least now I have another option.
-
I haven't read every post in this thread and maybe this has been discussed already but is the 6.8L being planned as a replacement for the 6.2L SOHC? That would probably make too much sense...