blksn8k2 Posted August 17, 2020 Share Posted August 17, 2020 I've had this '75 Bronco for several years now. With the way the value of these things has increased recently I thought it was time to drag it out of the mothballs. The biggest changes I've made to it so far have been to the drivetrain. When I got it it still had the old 302/3-speed stick combo. I replaced that with a stroked 351W (393 ci) and a New Venture NV-3550 5-speed manual transmission. I'm now starting to do some bodywork as the old girl has started to show some of the typical rust issues. I had already replaced some of the inner sheet metal like a section of the floor and parts of the front inner fenders a few years ago. Overall though the original body tub is in pretty good shape which is not very common for these old Broncos, especially in the Northeast. The problem now is that I am starting to see the typical rust at the rear quarter panel seams. The 1st gen Broncos used an unusual construction which I assume is similar to the '67 - '72 F-series. The upper section of the quarter panel includes the lower inner body panel (or inner bedside in the case of the trucks) that has the wheel well housing attached to it. The lower section of the outer quarter panel is a separate piece which is spot welded to a flange on the upper section. Bad idea as the resulting exposed horizontal seam is a prime location for rust. Several years ago I found a pair of one piece fiberglass quarter panels made by a CA company (KAL Offroad Racing). So far, after removing the rusted lower quarter panel section and trimming away most of the corner cap where the taillight mounts, I have trial fit the new passenger side fiberglass quarter. It actually fits over top of the original rust-free upper quarter panel section which means I am not losing any structural integrity. Still a lot of work to get it right but at least I have proven that I can make it work. The Bronco already had 'glass front fenders when I got it and I have another set of nearly perfect OEM steel doors. The doors that are on it now have way too much Bondo in them which is starting to crack. I also have a full convertible top with a folding frame which means I can finally get rid of that heavy-assed steel top. The only steel left on the outer body will be the doors, hood and tailgate and I am considering replacing the hood with a fiberglass one as well. The hoods on this gen Bronco extend from the grill all the way back to the base of the windshield and must weigh over 50 lbs. They are also held up by a prop rod. With a 3.5" suspension lift, 2" body lift and sitting on 35" tires getting the heavy steel hood lifted high enough to slide the prop rod in place is quite an exercise. I'm 5'-10 and the tops of the front fenders are chest high. James Duff makes a gas strut conversion kit for the steel hood and that may be an option as well. 3 1 Quote Link to comment Share on other sites More sharing options...
tbone Posted August 18, 2020 Share Posted August 18, 2020 That’s awesome! Thanks for sharing and periodically keep us Posted on your progress. Quote Link to comment Share on other sites More sharing options...
blksn8k2 Posted August 20, 2020 Author Share Posted August 20, 2020 On 8/18/2020 at 12:37 AM, tbone said: That’s awesome! Thanks for sharing and periodically keep us Posted on your progress. Thanks. Be careful what you ask for. LOL I started doing a little more trial fitting over the past few days. I now have the driver side quarter on and removed the green passenger side door and replaced it with this red one. It may look worse right now but believe me, it is in way better condition. The green door was even dented on the inside! I also cut out the opening and fitted the taillight on the passenger side quarter panel. When I found this roll bar it had a bunch of extra tubes added to it to make a full roll cage. It wasn't all that well done. I cut most of that trash off and used it to make a cage for my 4x4 Kubota tractor. I believe this is an original Bronco sport bar which may have been a factory option. Lots of folks will argue that Ford never offered such an option and maybe that's true but I seem to recall otherwise. Anyway, the diagonal bars and the bottom bar were part of the add-ons but I decided to leave those as they are. They may hinder access to the rear seat a little but you would have to be an acrobat to get back there anyway. I'm actually leaning towards leaving the rear seat out. The extra cargo space is more valuable. 1 1 Quote Link to comment Share on other sites More sharing options...
tbone Posted August 20, 2020 Share Posted August 20, 2020 Looking good. Keep’em coming. Quote Link to comment Share on other sites More sharing options...
blksn8k2 Posted August 21, 2020 Author Share Posted August 21, 2020 Latest: I cut out the opening for the fuel filler tube. Got lucky and just happened to have the correct size hole saw. I also draped the soft top over the old steel top so you can get a rough idea of what that's going to look like. Keep in mind that the whole truck will eventually be back to same color of green and the missing pieces of stainless trim will be put back on the quarter panels and passenger door. The top has been stored in a plastic bag for years so it's going to take some time and a good scrubbing to get all the wrinkles and crud out of it. Like I said before, the top also came with a folding frame. I'm still debating whether I want to put the side marker lights back on the quarter panels. Whoever did the previous bodywork didn't put them back on the 'glass front fenders either. Technically I may not have a choice since PA does have annual state safety inspections and side marker lights on both ends were a federal requirement in 1975. The good news is that all of the wiring for those lights is still there. 3 Quote Link to comment Share on other sites More sharing options...
tbone Posted August 21, 2020 Share Posted August 21, 2020 I’m looking forward to seeing the finished product. I think you need to buy a new Bronco as a sibling to this one. They would look great sitting aide by side! 2 Quote Link to comment Share on other sites More sharing options...
fordmantpw Posted August 22, 2020 Share Posted August 22, 2020 That's awesome! Love how she's coming together. Keep the updates coming! Quote Link to comment Share on other sites More sharing options...
blksn8k2 Posted August 26, 2020 Author Share Posted August 26, 2020 (edited) Started fine tuning the fit of the passenger side quarter panel. I believe this is about the best I can get. I've probably spent more time on this side than necessary but I have been removing the old metal a little at a time in an effort not to remove any more than necessary. Now that I know what is required the other side should go a bit faster. As I said before, because of the way Ford designed the body I couldn't completely remove the upper quarter panel since that piece of the body is also part of the inner body shell. You can see that area in the photo of the outer driver side and also in the photo of the inner passenger side. Other than the wheel well housing, that is one piece from the body floor to the top of the quarter panel where the top bolts on. One of the things I have done on the passenger side is cut the upper quarter panel along the entire length of the approximately 1 1/4" wide flange that the lower section was spot welded to. Then I overlapped the edge of the upper section underneath the edge of the lower section along that new cut line and used sheet metal screws to temporarily re-attach the two halves. You can see one of those screws in the photo taken from inside the body. I will eventually weld that seam and then cover it with seam sealer. BTW, there is also an interior trim panel that covers that area. Making that cut allowed me to push the old upper quarter panel sheet metal in far enough to get the one piece 'glass skin tucked in as far as possible. Based on what I had to do on the passenger side, I still have a bit more of the old lower quarter to remove on the driver side. You can see how badly it was rusted along that seam on the driver side in the last photo. Most of the remaining rust is what's left of the old lower section of the quarter panel. I still need to clean up that area with an air chisel and grinder and then make the same horizontal cut down the center of that flange as I did on the other side. The gap at the tailgate is only about 1/8" more than factory but it's still too wide for my taste. 3/16" is ideal and this is about double that. I will probably add some fiberglass material along the edge of the quarter panel where it meets the tailgate. I can't really get the quarter in any tighter without completely removing the old sheet metal which I don't want to do for obvious structural reasons. The passenger side door also fits a lot better now. By getting the new quarter skins tucked in as tight as possible (especially at the top) I shouldn't have to mess with the window frames on the doors which was one of my biggest concerns. I can now tilt the top of the door in further which is the way it is supposed to fit which also brings the top of the window frame in. Whew! Edited August 26, 2020 by blksn8k2 1 Quote Link to comment Share on other sites More sharing options...
tbone Posted August 27, 2020 Share Posted August 27, 2020 Perfection takes time. The work is looking really good. This forum will be a great record of your restoration. Definitely interesting stuff. Thanks for the update. Quote Link to comment Share on other sites More sharing options...
blksn8k2 Posted August 28, 2020 Author Share Posted August 28, 2020 Thanks for the encouragement. There are probably a few who might question why I went this route with the 'glass rear quarters when simply replacing the rusted original steel parts would not have been nearly as difficult. Well, that's a great question. First of all, I already had the fiberglass parts. I also realize that totally stock, "uncut" 1st gen Broncos are selling for ridiculous prices right now. However, most of the other body and suspension modifications were already done when I got this truck several years ago. Along the way I also replaced the engine and transmission with higher performance stuff. The cost of even attempting to restore this thing back to original would probably be higher than what I could realistically expect to sell it for. Besides, selling it is not my goal at this point. I just want to be able to enjoy driving it and replacing as much of the rust-prone steel body with fiberglass parts will make that goal easier to achieve. Most of the outer body panels on the new Bronco are aluminum and IMO that was an awesome choice on Ford's part. That is also one of the reasons I drive an F-150. In this part of the country rust is a real issue and anything that can be done to eliminate that issue is a good thing. Quote Link to comment Share on other sites More sharing options...
tbone Posted August 29, 2020 Share Posted August 29, 2020 Well considering you are using it as a driver I think it is a good call. I too live in the rust belt, so the fiberglass would be my choice as well. I’m very happy Ford chose to go aluminum for obvious reasons. Rust is such a pain in the ass. Quote Link to comment Share on other sites More sharing options...
blksn8k2 Posted September 1, 2020 Author Share Posted September 1, 2020 More photos. I decided to salvage the edge of the old steel corner cap and epoxy that strip of metal to the edge of the fiberglass to close the gap where it meets the tailgate. Not super confidant this will work since those two materials will expand and contract at different rates and the whole thing could eventually crack at the joint. I also used 'glass reinforced Bondo on the outside to fill in the seam. It is now in primer. So far so good as it has endured all the sanding and trial fitting without any cracks. The next step will be to add a few layers of 'glass mat and resin to the inside of the joint. Worst case if it does crack I will have to duplicate this edge with all fiberglass. IMG_4075 shows the gap at the tailgate after adding the steel strip. Anyway, I also added a bracket on the inside of the fiberglass so I could bolt the lower rear corner of the quarter panel to the body. There is a series of holes along the top of the quarter panel where the steel top bolts on and where the convertible top frame will eventually be bolted on. There is also one sheet metal screw at the very bottom that attaches the quarter panel to the door jam and rocker panel meaning the entire quarter panel will be removable similar to the front fenders. I plan to eventually paint the entire inside surface of the quarter panel including that bracket with Eastwood Chassis Black. The steel body tub under the new panel will get a fresh coat of POR15 topped with the same Eastwood paint. 1 Quote Link to comment Share on other sites More sharing options...
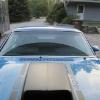
blksn8k2 Posted September 1, 2020 Author Share Posted September 1, 2020 Removed the nasty old steel top today. Couldn't resist snapping a few pics. Don't worry, the oil slick is from my old Kubota tractor. 1 1 Quote Link to comment Share on other sites More sharing options...
blksn8k2 Posted September 12, 2020 Author Share Posted September 12, 2020 I think I have the rear quarter panels fitting about the best I can. I also painted the existing steel inner body structure on both sides and adjusted the mounting brackets for the tailgate so that it aligns better with the new quarter panels. Adjusting those brackets was not as simple as loosening a couple of bolts. I actually had to cut the lower tailgate hinge brackets off of the corner posts, slot the existing holes and then remount the brackets about 1/4" higher so that I would have more vertical adjustment. If you compare these photos to some the previous you should be able see the difference in how well the top of the tailgate and it's body lines are now aligned with the same points on the new quarters. Next to be adjusted will be the doors, then the front fenders and finally the hood. It's that proverbial snowball effect and everything is based on the fitment of the quarter panels. 2 Quote Link to comment Share on other sites More sharing options...
danglin Posted September 12, 2020 Share Posted September 12, 2020 Keep the updates coming! Looking forward to see the finished machine? Quote Link to comment Share on other sites More sharing options...
tbone Posted September 14, 2020 Share Posted September 14, 2020 I can definitely see the difference in alignment, much improved. You are now dealing with those tedious details that take some time. How long before you go to paint? Quote Link to comment Share on other sites More sharing options...
blksn8k2 Posted September 18, 2020 Author Share Posted September 18, 2020 Who knows? I'm obviously not in any hurry since I hadn't touched this thing in nearly ten years. Between retiring, having to put up a new building on a new property in a different state and then moving everything over here plus a bunch of other home improvement projects along with hunting and fishing seasons I finally took the time to get back into the Bronco. Only problem now is that archery season starts in two weeks...It's a rough life I tell ya. ? 1 Quote Link to comment Share on other sites More sharing options...
blksn8k2 Posted September 18, 2020 Author Share Posted September 18, 2020 Did some farting around with the driver side door today. I rebuilt the upper hinge (new pin and bronze bushing) and replaced to lower one with one that came with the used red doors. I did have to make some extra shims out of sheetmetal to use between the hinges and the door jam. I think I have it about the best I can do for now. The rear bottom of the door doesn't align very well with the back end of the rocker panel but I think that is because whoever replaced that rocker panel before I got the truck didn't get it installed too straight. I plan to add a set of rock sliders and they will cover that entire area anyway as well as add a step. I added a photo of the sliders I plan to buy. One little issue I had was trying to adjust the back of the fender. The rear most fender bolt threads into a nut-sert in the inner fender. It was so rusty that I couldn't get the bolt in far enough to hold the fender in place. So...I had to run a 5/16-18 tap through the nut-sert but the only way I could turn the tap was with a small adjustable wrench which took forever along with several choice words. 1 Quote Link to comment Share on other sites More sharing options...
danglin Posted September 18, 2020 Share Posted September 18, 2020 Those Rock Sliders look sweet! Quote Link to comment Share on other sites More sharing options...
tbone Posted September 20, 2020 Share Posted September 20, 2020 (edited) On 9/18/2020 at 12:53 PM, blksn8k2 said: Who knows? I'm obviously not in any hurry since I hadn't touched this thing in nearly ten years. Between retiring, having to put up a new building on a new property in a different state and then moving everything over here plus a bunch of other home improvement projects along with hunting and fishing seasons I finally took the time to get back into the Bronco. Only problem now is that archery season starts in two weeks...It's a rough life I tell ya. ? Sounds like a terrible life you have there, lol. On 9/18/2020 at 5:03 PM, blksn8k2 said: Did some farting around with the driver side door today. I rebuilt the upper hinge (new pin and bronze bushing) and replaced to lower one with one that came with the used red doors. I did have to make some extra shims out of sheetmetal to use between the hinges and the door jam. I think I have it about the best I can do for now. The rear bottom of the door doesn't align very well with the back end of the rocker panel but I think that is because whoever replaced that rocker panel before I got the truck didn't get it installed too straight. I plan to add a set of rock sliders and they will cover that entire area anyway as well as add a step. I added a photo of the sliders I plan to buy. One little issue I had was trying to adjust the back of the fender. The rear most fender bolt threads into a nut-sert in the inner fender. It was so rusty that I couldn't get the bolt in far enough to hold the fender in place. So...I had to run a 5/16-18 tap through the nut-sert but the only way I could turn the tap was with a small adjustable wrench which took forever along with several choice words. The “choice words” help every project go smoother. I do like the rock guards. Edited September 20, 2020 by tbone 1 Quote Link to comment Share on other sites More sharing options...
blksn8k2 Posted September 20, 2020 Author Share Posted September 20, 2020 A couple of points on the fitment of the driver's door. The gap at the front is a little wider than I want and the gap at the windshield is not consistent (wider at the top). At the front, I should be able to move the fender closer to the door. I just haven't loosened all of the fender bolts yet. The grill has to move with the fenders so all that will probably have to wait until I can get the passenger door reassembled and adjusted and see where that fender needs to be. The fenders are fiberglass reproductions so the fit probably won't be perfect anyway. There is also no latch mechanism on the passenger door yet. As a matter of fact, right now it is just an empty shell. I still need to transfer all of the guts from the original green door. I also decided to go ahead and order all four new door hinges which I did yesterday. The ones on the driver side are okay but not perfect. As I said before I did rebuild one of those but there were way too many choice words required for that process so I decided the hell with it and ordered all new hinges. I lost track of how many really expensive drill bits I destroyed on just that one hinge. I also ordered new door jam backing plates for the strikers as well as some tailgate handle hardware. On the windshield alignment, with the top removed I currently have no way to hold it back at the top. You are also supposed to be able to add or subtract shims at the base to change the angle. Obviously haven't gone there yet either. The side to side angle kind of is what it is but that part looks pretty good where it aligns with the window frame on the driver's door so no issues there so far. Quote Link to comment Share on other sites More sharing options...
blksn8k2 Posted September 21, 2020 Author Share Posted September 21, 2020 Reassembled the passenger door enough to be able to check the fit. As expected, the gap at the front fender is a bit wide and the windshield needs to tilt back more at the top. Everything else looks good, actually better than the driver side. Next step will be to loosen both fenders and the bracket between the grill and core support so that both fenders can be moved rearward about 3/16". Hopefully that doesn't cause too much grief with the hood. Quote Link to comment Share on other sites More sharing options...
tbone Posted September 23, 2020 Share Posted September 23, 2020 It has to be mildly frustrating when you make an adjustment here, you will subsequently be left with an adjustment somewhere else. Very tedious work I’m sure. Will you be painting this with the body installed or are you taking the parts off to paint and then reinstalling? Quote Link to comment Share on other sites More sharing options...
fuzzymoomoo Posted September 23, 2020 Share Posted September 23, 2020 10 hours ago, tbone said: It has to be mildly frustrating when you make an adjustment here, you will subsequently be left with an adjustment somewhere else. Very tedious work I’m sure. Will you be painting this with the body installed or are you taking the parts off to paint and then reinstalling? Now imagine fitting a door on an assembly line in 90 seconds or less. I hated that job and traded it to someone else every time it came around in the rotation until they decided it was a better idea to just have 1 person doing it all the time. Quote Link to comment Share on other sites More sharing options...
blksn8k2 Posted September 23, 2020 Author Share Posted September 23, 2020 10 hours ago, tbone said: It has to be mildly frustrating when you make an adjustment here, you will subsequently be left with an adjustment somewhere else. Very tedious work I’m sure. Will you be painting this with the body installed or are you taking the parts off to paint and then reinstalling? Amen to the first part. I haven't decided how I'm going to paint it just yet but with the way I have attached the quarter panels I can unbolt them just like the fenders so I will have the option of removing them along with the doors and tailgate for painting. The only reason I would not do that is that it is really easy to nick the paint with all that handling. However, doing it that way would eliminate a ton of masking. I may decide to not paint the fenders and hood as they are more than good enough for what will be mostly a driver and only occasional show/cruise-in vehicle. 29 minutes ago, fuzzymoomoo said: Now imagine fitting a door on an assembly line in 90 seconds or less. I hated that job and traded it to someone else every time it came around in the rotation until they decided it was a better idea to just have 1 person doing it all the time. Fuzzy I have to believe modern day body tolerances and assembly equipment and techniques are vastly improved over what they were 50 years ago but it must still be a tedious job. Early Bronco bodies are cool looking but still very crude. It was just a utility vehicle after all. What's really sad is that the metal they used back then was actually formulated such that it promoted rust. The manufacturers didn't do it intentionally. They just didn't know any better. Speaking of which, here is an episode of an outdoor TV show that is filmed in my area. In this episode they are restoring an Early Bronco to use in a raffle to raise money for elk conservation in Pennsylvania. I actually saw the finished Bronco in person at SEMA of all places. Small world. Yeah, the show is kinda folksy but the guy from Dynacorn gives a pretty good explanation of the rust issues on vehicles of this age. It starts at around the 19:10 mark. The restoration shop is about 30 miles from me and the Bronco they used was found on a farm about 10 miles from me. BTW, this episode is also where I found out about the wheels that I bought for my '70 Mach 1. 1 Quote Link to comment Share on other sites More sharing options...

Recommended Posts
Join the conversation
You can post now and register later. If you have an account, sign in now to post with your account.
Note: Your post will require moderator approval before it will be visible.